Does anyone know how to do this?
I couldn’t find anything to bind to that would change this value.
I have two scenes setup that I need to switch back and forth from quickly.
I have a Yamaha A3050.

Does anyone know how to do this?
I couldn’t find anything to bind to that would change this value.
I have two scenes setup that I need to switch back and forth from quickly.
I have a Yamaha A3050.
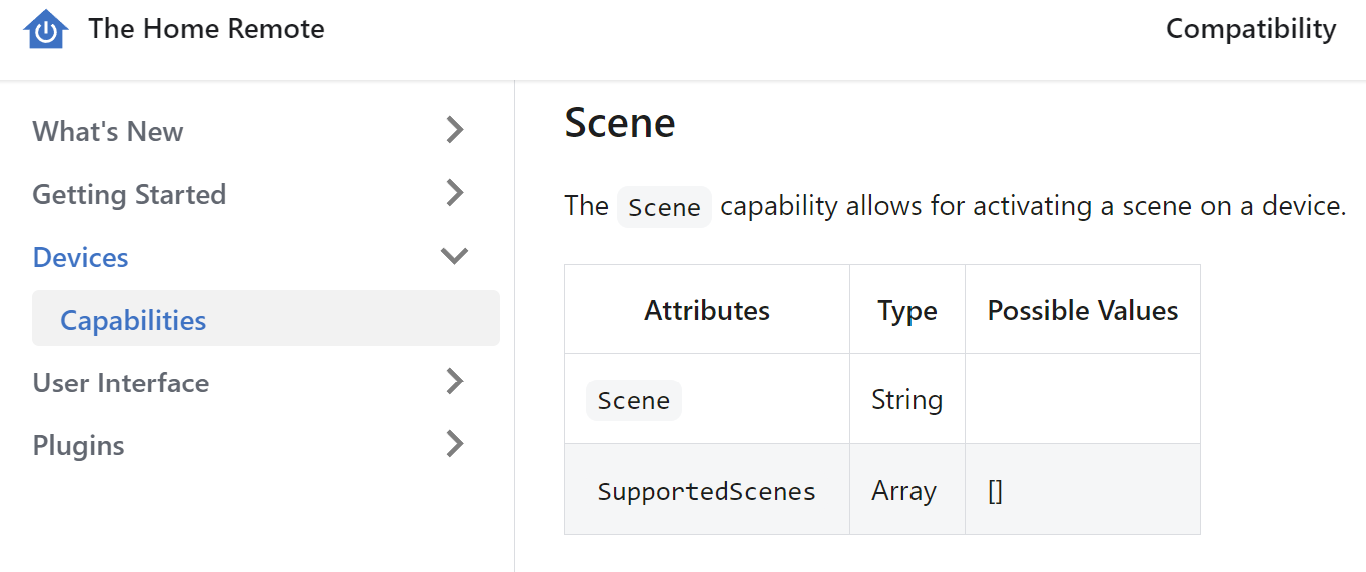
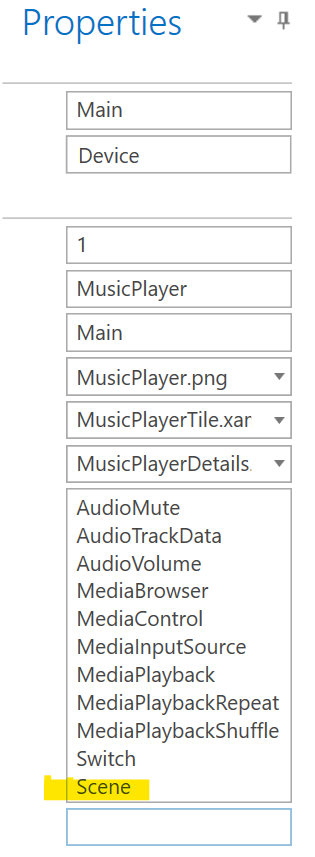
It looks like the Scene capability is supported (see attached screenshot). Manually add Scene to the capabilities under the Yamahas zones properties (see attached screenshot). I would imagine the string would be the zone number in numeric form i.e. 1 2 3. Honestly I have never utilized the Scene capability directly via home remote but rather I invoked the scenes via home remotes connection to my vera hub of which I had a Yamaha plugin installed. Give it a shot though…
Thanks, I’ll give that a try as soon as I can keep the designer from blanking all my pages.
Unfortunately, this did not work.
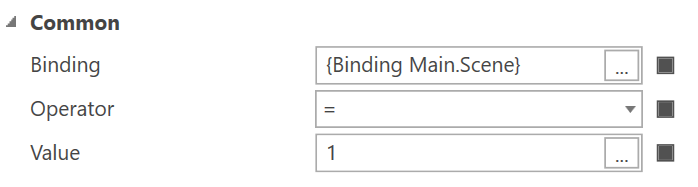
I got an “Invalid variable Room.Scene” error when I click on my button.
I tried binding a label to Room.SupportedScenes but it’s just blank.
That was just an additional step I took for a label to see if there were any specific values that were acceptable.
For the button, I used Room.Scene.
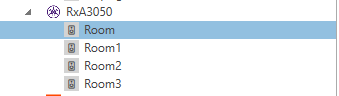
What are your Yamaha zones named under devices? They are not Main, Zone2, and Zone3?
No, they are Room, Room1, Room2, Room3.
As a test I tried to get this to work on my Yamaha receiver and I am afraid I experienced the same issue as you did. The best bet is if you have a hub that supports the Yamaha and Home Remote to take that route in controlling scenes. Other than that you can replicate the scene in Home Remote with the commands that are supported.
I ended up making a small plugin to handle just the scenes. And I made another one to properly handle the volume controls, since what’s there now doesn’t accurately handle absolute volume - a limitation of one of Yamaha’s APIs.
Hoping that link works.
They’re pretty quick and dirty, not a lot of validation. And, with a little more work, they could probably be combined into one plugin, but I was lazy.
Of course, you’ll have to edit them to use the IP address of your device instead of mine.
For the Volume Adjustment (I just use the Volume attribute - any attribute that accepts a string should work), use the values of “Up” or “Down” to step by .5 dB. To jump to a specific decibel level, enter the value accounting for a decimal space. For example, if you want to set it to -10 dB, you’d enter -100 as your value. If you want to set it at +2.5 dB, you’d enter 25 for the value.
For the scenes, again, I think I used the volume attribute, but pretty much any should work. Just set the value to the number of the scene. Scene 1? Enter 1. Scene 2? Enter 2.
And the last one is for mute toggle (as opposed to one command for on, one for off). I don’t think it matters what attribute or value you use, it just has the one command.
Hi Kevinicus,
can you try this YamahaController plugin?
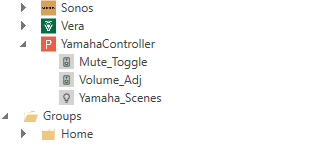
This is your plugin code of the 3 functions merged into one plugin. The IP address and the polling interval can be set in the plugin settings. The functionality has not changed - a device is created (YamahaController) which contains the three functions as sub devices. This makes the plugin list clearer.
You can find the latest Version of the Plugin here:
That works pretty well, and does clean it up a bit.
I did have to change device to device.DisplayName within your if block.
Also, as far as I can tell, Switch doesn’t work well for the Scenes. Looks like the value is set to null if it’s not On or Off. I just added a volume attribute to it and used that.
Once the kinks are worked out, please post in the plugin category so other people can use in the future!
I don’t want to adorn myself with other people’s feathers here, the code was created with the help of Microsoft Copilot and only took a few seconds to get it. For the creation of plugins it works amazingly well and as you can see, it only needs a few corrections.
LG,
Kalle
Great work on the Yamaha PlugIn. It resolved an issue I had on my 10 year old MusicCast device where the HomeRemote volume control (0 - 100%) would only scale my actual volume -80 to 0 db. With this plug in, now I can get the full range -80 to +16.5 db from my device. I never need volume louder than -20db on my Main_Zone but my Zone_2 can use the additional volume range.
I created a 4th device ID for my Zone_2 by copying your “Volume_Adj” device and changed “Main_Zone” to “Zone_2” in the “payload” line.
One question, If I want to have each “UP” or “Down” button press cause a 1 db change instead of the 0.5 db change, is there anything I can change in the plugin to do this?
Many thanks.
Sure.
You can change it like so:
Update the DefaultSettings to include a VolumeStep setting. You’ll then be able to set that to whatever you want it to be (don’t adjust the decimal spacing - if you want a 1.5 dB step, just enter 1.5).
Update the onChangeRequest to how it is below.
// Change 1 - Update Settings
plugin.DefaultSettings = {
    "IpAddress": "YamahaReceiverIP",
    "PollingInterval": "1000",
    "VolumeStep": ".5"
};

// Change 2 - Update onChangeRequest method.
function onChangeRequest(device, attribute, value) {
	// I suggest using the Volume attribute for each of these for simplicity.

    console.log(device + "    " + attribute + "    " + value);

    let payload = '';
    let yamahaUrl = 'http://' + plugin.Settings["IpAddress"] + '/YamahaRemoteControl/ctrl';

    if (device.DisplayName == "Volume_Adj") {

		// Numerical values are whole integers. The last digit of the entered value is after the decimal of
		// the desired volume. For example: 10 dB would use the value of 100. 2.5 db would use the value 25.
		// And -12.5 db would use the value -125.
        let newVolume = 0;

        if (value != 'Up' && value != 'Down'){
            newVolume = value;
        }
        else{
		let statusUrl = 'http://' + plugin.Settings["IpAddress"] +'/YamahaExtendedControl/v1/main/getStatus';
        	console.log(statusUrl);
        	let status = http.get(statusUrl);
		let currentVolume = status.data.actual_volume.value * 10;

		if (value == 'Up'){
			newVolume = currentVolume + (plugin.Settings["VolumeStep"] * 10);
			}
		else{
			newVolume = currentVolume - (plugin.Settings["VolumeStep"] * 10);
			}
	 }
        payload = '<?xml version="1.0" encoding="utf-8"?><YAMAHA_AV cmd="PUT"><Main_Zone><Volume><Lvl><Val>' + newVolume + '</Val><Exp>1</Exp><Unit>dB</Unit></Lvl></Volume></Main_Zone></YAMAHA_AV>';
    }
    else if (device.DisplayName == "Mute_Toggle") {
	// The attribute/value entered are not important to this command.
        payload = '<?xml version="1.0" encoding="utf-8"?><YAMAHA_AV cmd="PUT"><Main_Zone><Volume><Mute>On/Off</Mute></Volume></Main_Zone></YAMAHA_AV>';
    }
    else if (device.DisplayName == "Yamaha_Scenes") {
	// The value entered is simply the number of the scene you wish to select. If you want the first scene on your receiver enter the value 1. For the second scene
	// enter the value of 2, and so on...
        payload = '<?xml version="1.0" encoding="utf-8"?><YAMAHA_AV cmd="PUT"><Main_Zone><Scene><Scene_Load>Scene ' + value + '</Scene_Load></Scene></Main_Zone></YAMAHA_AV>';
    }

    let response = http.post(yamahaUrl, payload);
    let data = response.data;

    console.log(data);
}
That works! Thank you.
Very good job - I have uploaded the new version in the plugin section