Panasonic AE4000u RS232

I am attempting to figure out Home Remote. I have the above projector with IP2SL Global Cache device attached. I have the 2 following commands to turn on/off the projector

Turn on= \x02PON\x03\x0D

Turn Off= \x02POF\x03\x0D

I created a TCP Project
Properties are 192.168.2.5 (IPSL IP)
Port 4999
I added 2 TcpVariable
1 is called Projector Power0n while the other is Projector Power0FF
I setup a test power button
Set as a toggle
event trigger=checked
collection=DataAction
Binding=Projector Power On

event trigger=unchecked
collection=DataAction
Binding=Projector Power OFF

I have tested the commands using Global Cache itest. Both commands turn on/off the projector using itest.

Using home remote with the above setup, I can power on the projector but not power off the projector.

Any ideas on how to fix my setup?

Add toasts to your Checked & Unchecked events so you can at least track what’s happening when you click the Button. See attached project.
Toggle_Monitor.hrp (7.4 KB)

I will say, this isn’t going to work very well if you haven’t set up your DataTriggers which it appears you haven’t. You need to have something that updates the IsChecked state on the toggle when the actual device state changes. Without, you will probably end up having to click these buttons 2x in many cases. You won’t be able to set up these DataTriggers if you don’t have a status working. If you don’t have status working for this device you really should be using 2 separate buttons because your toggle will be very prone to getting out-of-sync with the actual device.

Watch Brian’s YouTube video on DataTriggers & Toggle Switches. A ToggleSwitch is set up exactly like a ToggleButton, so his video will help you here. One of the best things you can do when troubleshooting is add a Label to your page that shows the current state of the device. Exactly as Brian does at 1:30 in this video.

This is the Power status command \x02QPW\x03\x0D

I am wonder what it would take to modify the Runco Projector plugin to work with my Panasonic projector. It utilizes a Ip2sl

Hi Bill H,
I was wondering if you had any success modifying the Runco Projector plugin to work with the Panasonic? I’m trying to do that now and getting an error when I try to turn it on. I have a working plugin but it’s a bit outdated and I was just trying to use one that works with the new tiles. I’m new to these plugins so it’s a bit of trial and error for me. Just wondering if someone had an updated Panasonic project plugin. I’m using the ITach IP2SL.

Thanks,
Mark

Hi Mark, I wrote the Runco Projector plugin and while I haven’t played with it in a while, I tried to make it fairly modular. In theory, you should be able to just replace the various commands up at the top and may possibly need to tweak how they are sent and it ought to just work (feedback like power status might be a little trickier). I’m fairly certain I remember helping someone on the old forum adapt an earlier version for a Panny projector. If you can post a link to the docs and a copy of the working plugin you’ve got, I’d be happy to take a look.

HFN! Yep…that was me actually. I started to work with THR last year but then got pulled into other projects and priorities. I’ve come back to this again and have made much more progress overall but THR has also come quite a ways since then. I was trying to get the plugin to work more with feedback so the power could be controlled via the tile and the details template. Here’s what I’ve got so far but I think I’ve just hacked it up. Here’s the docs (serial control starts on page 47): https://www.projectorcentral.com/pdf/projector_manual_3439.pdf

Edit:
I edited the plugin more tonight. Here’s an updated plugin but it’s still not updating the status. It looks like my “switch/case” statement isn’t being picked up. Any thoughts on what I’m doing wrong?
PanasonicProjector_06272021.plugin (7.8 KB)

I appreciate all your help! Thank you so much!

Hi Mark,

I thought it might have been you I had helped out in the old forum, but I couldn’t find the post to check. Hope everything (aside from this feedback issue) has been working well in the meantime!

I took a look at the docs and your plugin code. It’s not 100% clear to me from the docs, but if you look at pg. 48, where it is describing the Inquiry commands and the Basic format, I think what may be happening is that the projector responds in the same command format that you send commands in. Otherwise, it doesn’t really make sense to list the “parameters” for the various inquiry commands, because it would be very inefficient to have to query each option to find out which one is correct. So, for example, if you send:

  • \x02QPW\x03

I think what you would get back is:

  • \x02QPW:000\x03 (if off)
    or
  • \x02QPW:001\x03 (if on)

If so, the trick is to parse that before going into your switch statement. As you can see in the Runco Projector plugin code, I had to do something similar on that projector with the:

  • responseVal = response.split(" = ")[1];

In that case, you would send the command then get back the command followed by " = <value>".

Here, you could do something similar with .split(":")[1], which would give you everything to the right of the colon (000\x03). The only trick at that point is to strip the \x03, which is probably a non-visible character. I don’t know whether the .trim() call that is already there will strip that or not; it’s typically used for stripping whitespace and I’m not sure how it would work on the \x03. I’m no kind of JavaScript expert, unfortunately, so you might have to google around a little in the JavaScript docs to see what an appropriate call might be. But it’s worth a try with just the split() and the existing trim() to see if that does the trick. Another thing to try, although very clunky, would be to invoke split() a second time like: split("\x03")[0], which would give you everything to the left of the \x03.

Hopefully some of that is useful–happy to keep spitballing, but some more details on what exactly is coming back from the projector would be very helpful.

Good luck!

HFN

1 Like

You were on it and so close to the solution! I literally just about 5 minutes ago was able to get it working. I copied/pasted the log from the HR Designer console to notepad and was able to see leading and trailing spaces before the “000” and “001” response codes. I added a Javascript (response = response.slice(1, -1)) and it worked!

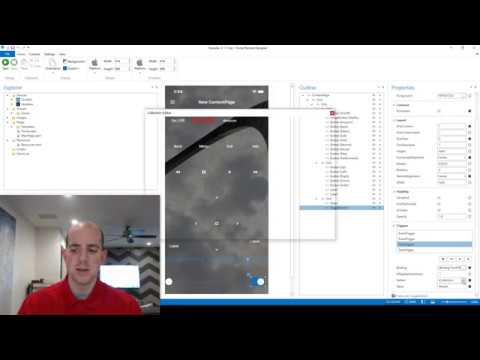
I then added the Input Source to the tile as well. Had to do the same slicing there but worked just fine. Now if I can only get that to turn blue like the rest of the text. :slight_smile: But I’m pretty happy with it either way.
Thank you!

Great, I’m glad you were able to get it to work!

I’m trying to control a device with The Home Remote using rs232.

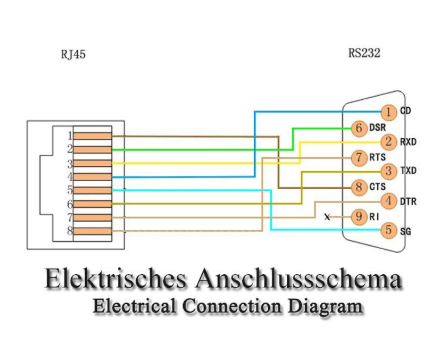
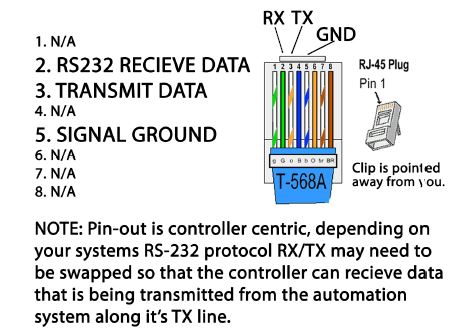
I have a global cache with serial ports for this. The device accepts an RJ45 jack. I’m trying to figure out what kind of ethernet cable I’m going to need for the pinout they have.

They have it listed as:

  1. n/a
  2. RS232 Receive Data Pin
  3. Transmit Data Pin
  4. N/A
  5. Signal Ground
  6. N/A
  7. N/A
  8. N/A

Colors for pins:

  1. Green/White
  2. Green
  3. Orange/White
  4. Blue
  5. Blue/White
  6. Orange
  7. Brown/White
  8. Brown

Would I need a standard ethernet cable, or crossover, or something custom?

And what would I need at the Global Cache end? I have ethernet to serial adapters where I can set the pin layout.

Likely a custom cable will be needed. I’m using the Global Cache iTach WF2SL (WiFi to serial) for LG TV control. The RS232 manual for the LG shows the pin out. Note I needed to use a Null Modem adapter, which swaps RX and TX pins.